Local Ubuntu Repos
Introduction
Ubuntu (and the software that runs on it) heavily relies on the Internet. Often, the end user doesn't even see the package to be installed: all it takes is to run a terminal command. Most of the time, this is very convenient. Unless you have no Internet connection.
The good news, unless the authors of a particular software tried really hard to achieve the opposite, installing is still possible: we can figure out where the package comes from and where it should be copied.
And here comes the next problem: there are VERY many packages in Ubuntu world, and it is hard to predict, which one we'll need. Also, packages have dependencies.
Again, dependencies are not a big deal provided we have the Internet connection: the corresponding utilities (like the apt) will figure out that something is missing and pull it from the Repository. Unless we download it today and install tomorrow, on the computer with different software installed: in that case we don't know what dependencies are required, so we need to get all of them.
In other words, for offline installation, we have three choices.
First, we can work on package-by-package (plus dependencies) basis.
Second, we can scan a computer where everything is already installed, and
install exactly the same set of programs on the second computer. This approach
works fine for configuring identical computers.
Third, we can copy the entire set of Ubuntu repositories. Then, whatever
we want to install (from those repositories), we will have it, and all
its dependencies.
Below, few methods, applicable for different cases, are listed. Note that this article is far from being complete, it is just a list of notes I have taken for my own use.
A. Download .deb files for specific package
You can save all the deb files for a package, with dependencies, using the following command:
$ sudo apt-get --download-only install packagename
The files will be stored under /var/cache/apt/archives, so first, we need to run
$ apt-get clean
to make sure the target directory is empty. Then if you want (for example) to download a2ps package and all dependencies, you should type
$ sudo apt-get --download-only install a2ps
That way a subsequent call to
$ apt-get install a2ps
will be able to complete without any extra downloads.
Here is the problem: you are not exactly creating any archive, you are just caching things. So the moment you clean up the cache (as we did above), you loose it all.
Another problem occures if on this computer the package is already installed, in this case nothing is downloaded. So if you intend to copy the package(s) you downloaded and to move them to another (offline) computer, it should be a computer that has the exact same packages.
We are going to suggest one more solution to this problem in a section B.
B. What if the package is already installed?
The apt-get will not download package (or some of its
dependencies) if they are already installed.
There are many workarounds, that can be broken into two cathegories:
either we use some other tool to build a list of dependencies
or we use a clean system.
Example: you could try parsing the output of apt install --simulate
and then run apt download for each package.
Here is an elegant solution: we create a Docker image and download everything we need; as the image is "clean", we don't have to worry about dependencies being skipped (as we know they are not installed in Docker image).
Also, this solution allows us to download packages for an architecture, version of OS etc. that is different from what we have on our computer (in an example, arm64 is used).
docker run --name arm64-packages --rm -dit ubuntu:20.04 bash

docker exec arm64-packages dpkg --add-architecture arm64

docker exec -i arm64-packages bash <<EOF

cat > /etc/apt/sources.list.d/arm64.list <LIST

deb [arch=arm64] http://ports.ubuntu.com/ focal main restricted

deb [arch=arm64] http://ports.ubuntu.com/ focal-updates main restricted

deb [arch=arm64] http://ports.ubuntu.com/ focal universe

deb [arch=arm64] http://ports.ubuntu.com/ focal-updates universe

deb [arch=arm64] http://ports.ubuntu.com/ focal multiverse

deb [arch=arm64] http://ports.ubuntu.com/ focal-updates multiverse

deb [arch=arm64] http://ports.ubuntu.com/ focal-backports main restricted universe multiverse

LIST

EOF

docker exec arm64-packages apt-get update || : # Is expected to return error.

docker exec arm64-packages apt-get download libc6:arm64

package_path=$(docker exec arm64-packages ls / | grep libc6)

docker cp arm64-packages:$package_path ./libc6_arm64.deb
C. Make .deb files for specific package available (1)
In section A, I have mentioned the problem: when we use tools like
apt-get and the package we want to download (or one of its
dependencies) is already installed on our computer, nothing
happens. I have also mentioned two ways to solve the problem: either
to work from a "clean" system (described above in a section B),
or to get the list of dependencies in an independent way.
Let's ignore these problems for now: in this section we assume that we already
have our packages, and we want to make them available for apt-get to use.
- Install dpkg-dev
- Put the packages in a directory
- Create a script that will scan the packages and create a file apt-get update can read
- Add a line to your sources.list pointing at your repository
Install dpkg-dev
$ sudo apt update && sudo apt upgrade

$ sudo apt-get install dpkg-dev

# or

$ sudo apt-get install -y dpkg-dev
Note: If you are planning to configure your local APT repository for use by other (client) machines on your network, then you should install a server (like Apache web server) to host your APT repository. See sections K, L, M below for instructions.
Create a directory where you will keep your packages. For this example, we'll use /var/www/html/repo, as this path is compatible with Apache server: in case you want to use it at some point. If not, choose any folder you want.
$ sudo mkdir -p /var/www/html/repo
As this section is for "copying .deb files for specific package(s)", the next step should be to move your packages (we assume you have packages) to a folder you just created. However, just as an example, let's provide the code to grab a package from online source: we are going to use one for Google Chrome. Note that this package is also available in Ubuntu repositories, so if you choose to follow "get all" section below, you don't have to copy Chrome separately.
$ sudo wget https://dl.google.com/linux/direct/google-chrome-stable_current_amd64.deb
wget is a simple tool allowing you to get files you want, or even an entire Ubuntu repo (see one of chapters below), but it doesn't track updates, so the next time you will probably have to re-download everything, just to get few new or updated files. apt-mirror is prefered if you plan getting updates from time to time (and you work with repos, while wget can download from any sources).
Now move your packages into the directory you've just created. Previously downloaded Packages are generally stored on your system in the /var/cache/apt/archives directory. If you have installed apt-cacher, you will have additional packages stored in its /packages directory.
Create a script file update-mydebs to scan and update the Packages.gz file. It is required, because you may add new .deb packages in your local APT repository, from time to time. Therefore, you want to update the Packages.gz file, each time after add a new .deb file in repo directory. Doing it using script is easier.
#! /bin/bash

cd /var/www/html/repo

dpkg-scanpackages . /dev/null | gzip -9c > Packages.gz


# Another example:

# Here's we update AMD64 packages on my LAN:

# Note that here we use /var/www/debs/ directory: why not?

$ cd /var/www/debs/

$ dpkg-scanpackages amd64 | gzip -9c > amd64/Packages.gz


# Another example: note that "cd" is not used here

# and Packages are not compressed

$ sudo dpkg-scanpackages /var/www/html/repo /dev/null > /var/my-local-repo/Packages
wget respects the robots.txt file when crawling recursively through web sites. You can override this behaviour with -e robots=off
Cut and paste the above into gedit, and save it as update-mydebs in ~/bin. (the tilde '~' means your home directory. If ~/bin does not exist, create it: Ubuntu will put that directory in your PATH. It's a good place to put personal scripts). Next, make the script executable:
$ chmod u+x ~/bin/update-mydebs
How the script works:
dpkg-scanpackages looks at all the packages in /var/www/html/repo,
and the output is compressed and written to a file (Packages.gz) that
apt-get update can read. /dev/null is an empty file; it is a substitute
for an override file which holds some additional information about the
packages, which in this case is not really needed.
Add the following line to your /etc/apt/sources.list, and you're done.
# This is for access from the same comp

deb [trusted=yes] file:/var/www/html/repo ./


# This is for access over LAN; it is from another

# source, so a different path is used:

$ deb http://localhost/debs/ amd64/
Adding and Removing Packages
# Remove packages

$ rm /home/srv/packages/local-xenial/some_package_idont_like


# Add packages

$ cp /some/dir/apackage.deb /home/srv/packages/local-xenial
Using the Repository
Whenever you put a new deb in the /var/www/html/repo directory, run:
$ sudo update-mydebs

$ sudo apt-get update
Now your local packages can be manipulated with Synaptic, aptitude and the apt commands: apt-get, apt-cache, etc. When you attempt to do apt-get install, any dependencies will be resolved for you, as long as they can be met.
Installing a file from this repository
Let's use Chrome as an example:
$ sudo apt install google-chrome-stable
To remove our installed packages:
$ sudo apt remove google-chrome-stable
D. Make .deb files for specific package available (2)
In section A, I have mentioned the problem: when we use tools like
apt-get and the package we want to download (or one of its
dependencies) is already installed on our computer, nothing
happens. I have also mentioned two ways to solve the problem: either
to work from a "clean" system (described above in a section B),
or to get the list of dependencies in an independent way.
In this section we are going to download specific package(s) with
dependencies (with the intention of using apt-get in future).
After downloading, it create a Packages.gz file so that you can add the repository folder (that you created) to the target machine's /etc/apt/sources.list file, making it available for offline use.
Here we use 3 scripts:
dependencies.sh
getpkg.sh
mkrepo.sh
Use chmod to make them executable.
Dependencies
There are two scripts within this gist which will aid you
in creating your offline repo:
getpkg.sh
mkrepo.sh
The script getpkg.sh depends on the package apt-rdepends.
The script mkrepo.sh depends on the program dpkg-scanpackages
which is part of the dpkg-dev package.
In order to install this dependencies simply run:
$ sudo ./dependencies.sh
Downloading packages
To download an apt-get package (including its dependencies) run:
$ ./getpkg.sh <package-name> <packages-directory>
where <package-name> is the name of the package you are trying to store locally and <packages-directory> is the path to the directory where you'll be storing the downloaded packages.
Example:
$ ./getpkg.sh build-essential /home/user/my-repo
WARNING: Since this script downloads not only the deb package, but its dependencies as well, be sure you have a decent amount of free hard-disk space since things can quickly escalate. For example, the package ubuntu-desktop when downloaded with dependencies and all, weighs well over 300MB.
Turning your packages directory into a repo
The following should only be done once, after having downloaded all
the packages you deem necessary to be in your offline repository
(as in, after having followed the steps in the Downloading packages
section of this guide).
In order to transform the directory where you placed your repository's
packages into an actual apt-get valid repo, just run:
$ ./mkrepo.sh <packages-directory>
where <packages-directory> is the path to the directory where you stored the downloaded packages.
Example:
$ ./mkrepo.sh /home/user/my-repo
Using your offline repo
Let's say you have a machine with no internet connection which runs
Ubuntu, and you wish to install some apps not included in the provided
apt-get repository.
You followed the steps in this guide and stored within a usb
pen-drive a directory called my-repo, which contains the apps you want
to install and a file named Packages.gz.
You plug this repo-wielding usb pen-drive into the offline Ubuntu
machine, and you make sure to mount it to the route /media/repo-usb.
Now you can add the following line to the /etc/apt/sources.list
file, in the offline Ubuntu machine:
$ deb [trusted=yes] file:/media/repo-usb/my-repo ./
Run the command:
$ sudo apt-get update
You can now sudo apt-get install your packages.
dependencies.sh
#!/usr/bin/env bash


if [[ $EUID -ne 0 ]]; then

    echo "This script must be run as root" 1>&2

    exit 1

    fi


apt-get update


apt-get install -y apt-rdepends dpkg-dev gzip
getpkg.sh
#!/usr/bin/env bash


function error_exit

{

    echo "$1" 1>&2

    echo "Usage: ./getpkg.sh  " 1>&2

    exit 1

}


PKG="$1"

PKGDIR="$2"


if [ -z "$PKG" ]; then

    error_exit "No package name set!"

    fi


if [ -z "$PKGDIR" ]; then

    error_exit "No packages directory path set!"

    fi


cd $PKGDIR


for i in $(apt-rdepends $PKG|grep -v "^ ")

    do ! apt-get download $i


done
mkrepo.sh
#!/usr/bin/env bash


function error_exit

{

    echo "$1" 1>&2

    echo "Usage: ./mkrepo.sh <packages-directory>" 1>&2

    exit 1

}


PKGDIR="$1"


if [ -z "$PKGDIR" ]; then

    error_exit "No packages directory path set!"

    fi


cd $PKGDIR


dpkg-scanpackages ./ /dev/null | gzip -9c > ./Packages.gz
E. Copy existing configuration (1)
Let's say you have a preconfigured computer. To copy packages it has:
$ for i in 'ls -1 /var/cache/apt/archives' ; do sudo cp /var/cache/apt/archives/$i /home/jj/Documents/Repository ; done

# As they are owned by root, so that you can copy it to removable media

$ chown jj:jj *


# To reinstall

$ sudo dpkg -i /home/jj/Documents/Repository/*.deb
Same functionality can be placed in a bash file:
#!/bin/bash

for i in 'ls -1 /var/cache/apt/archives/' ; do sudo cp /var/cache/apt/archives/$i /home/jj/Documents/Repository ; done
Quote: You can ignore this error
"cp: omitting directory '/var/cache/apt/archives/partial'"
Mine is empty.
Note: this section might require the script from the "G. Off-line Repository and software removal" (below).
F. Copy existing configuration (2)
We can use apt-offline to prepare a list of packages that need to be installed. Then we can install the software we want, and then transfer that list to a machine with internet access, download the needed packages, transfer these back to our offline computer, then install them there.
Go to https://packages.ubuntu.com and download the .deb file of apt-offline for your architecture (it has no special dependencies, so you only need that)
Use scp to copy the deb file onto your offline server:
$ sudo dpkg -i apt-offline*something.deb on the server
Generate a request for a package index update and consequent installation of a package on the offline machine:
$ sudo apt-offline set --install-packages PACKAGENAME --update apt-offline.sig
Copy that apt-offline.sig file to your online machine. On the online machine, execute:
$ apt-offline get --bundle bundle.zip apt-offline.sig
Copy the bundle.zip to your offline machine. On the offline machine:
$ sudo apt-offline install bundle.zip
Finally, you can install the package on your offline machine:
$ sudo apt install PACKAGENAME.
G. Using apt-cacher
The difference between apt-cacher and apt-m APT-Mirror: apt-cacher does not mirror the entire repository. Instead, it saves the packages that are requested by the clients, so that the next time some other client requests them, they are used from the local network.
In our use case (we want to have an archive for future, just in case), it means that we can work on a "main" computer, without worrying about archives, as the configuration of this computer will be cached as we install new software. Then, when we have to clone this computer's content to another machine, we don't have to synchronize anything: it is already cached on our "main" computer, so we can use it as a server and copy its configuration to other (client) machines.
First, if you plan to share the packages with client computers over the LAN (an alternative is, for example, saving them to a removable storage), install Apache server (section J).
Install the apt-cacher:
$ sudo apt-get install apt-cacher
Choose daemon to run as a standalone daemon and click OK.
Edit file /etc/default/apt-cacher:
$ sudo gedit /etc/default/apt-cacher
... and set autostart=1 if it is 0, else leave as it is.
Note: You may have problems doing this on a machine with apache already installed.
# apt-cacher daemon startup configuration file


# Set to 1 to run apt-cacher as a standalone daemon, set to 0 if you are going

# to run apt-cacher from /etc/inetd or in CGI mode (deprecated).  Alternatively,

# invoking "dpkg-reconfigure apt-cacher" should do the work for you.

#

AUTOSTART=1


# extra settings to override the ones in apt-cacher.conf

# EXTRAOPT=" daemon_port=3142 limit=30 "
Restart Apache:
$ sudo service apache2 restart
Test apt-cacher by pointing your web browser to http://server:3142/apt-cacher to verify that it's running.
You can also allow or deny the no of hosts to access the cache (packages). To do that, open the /etc/apt-cacher/apt-cacher.conf file:
$ sudo gedit /etc/apt-cacher/apt-cacher.conf
Uncomment and update the value for allowed_hosts to match the individual hosts.
Here I allowed systems from 192.168.1.20 to 192.168.1.30.
Change the admin_email email address to something meaningful.
[...]

## Uncomment and set the IP range ##


allowed_hosts = 192.168.1.20 - 192.168.1.30

# Or

$ allowed_hosts = * # (Or set allowed_hosts to something appropriate.)


#denied_hosts =

[...]
After completing all the steps, restart apache2 service:
$ sudo systemctl restart apache2

# or,

$ sudo service apache2 restart
If you want to cache multiple distributions, uncomment the line and set distinct_namespaces value to 1:
$ distinct_namespaces = 1
By default apt-cacher may have problems with upgrades of Ubuntu from one version to another when running
$ do-release-upgrade -d
This can be fixed by uncommenting the line beginning with installer_files_regexp and modifying it from:
installer_files_regexp = ^(?:vmlinuz|linux|initrd\.gz|changelog|NEWS.Debian|UBUNTU_RELEASE_NAMES\.tar\.gz(?:\.gpg)?|(?:Devel|EOL)?ReleaseAnnouncement(?:\.html)?|meta-release(?:-lts)?(?:-(?:development|proposed))?)$
to:
installer_files_regexp = ^(?:vmlinuz|linux|initrd\.gz|changelog|NEWS.Debian|[a-z]+\.tar\.gz(?:\.gpg)?|UBUNTU_RELEASE_NAMES\.tar\.gz(?:\.gpg)?|(?:Devel|EOL)?ReleaseAnnouncement(?:\.html)?|meta-release(?:-lts)?(?:-(?:development|proposed))?)$
Note the addition of [a-z]+\.tar\.gz(?:\.gpg)? in the regexp
Restart apt-cacher:
$ sudo service apt-cacher restart
Client Side Configuration
There are two ways to configure your clients to use apt-cacher.
1. Modify your sources.list file
2. Alternatively (Recommended) configure Apt to use the proxy directly.
Now, create a file called /etc/apt/apt.conf.d/01proxy:
$ sudo gedit /etc/apt/apt.conf.d/01proxy
Add the following line:
Acquire::http::Proxy "http://<IP address or hostname of the apt-cacher server>:3142";

Ex.:

Acquire::http::Proxy "http://192.168.1.102:3142";
Here, 192.168.1.102 is my Ubuntu local repository server's IP address. Replace the IP address with your server IP address.
Now, update the sources list using command (Save the file and then on the $ server run apt-get update):
$ sudo apt-get update
If that succeeds without errors then update your server with
$ apt-get dist-upgrade
To install packages of your choice:
$ sudo apt-get install
H. Using apt-cacher-ng
An alternative to repository mirroring is to set up a local caching server for Apt/Yum repositories. In this case any downloaded packages are cached on the caching server, so any subsequent installation of the same packages can be done quickly.
apt-cacher-ng is an APT/deb aware proxy, it is customisable and can cache
your deb files for quite a while (configurable).
You install it with:
$ apt-get install apt-cacher-ng

# or

$ apt install apt-cacher-ng
Once you install it, apt-cacher-ng will be set to auto-start on your system. The default configuration file for apt-cacher-ng is found at /etc/apt-cacher-ng/acng.conf. It is heavily commented, make sure you read it. But for most cases, the default configuration will do. Any time you modify the configuration, restart apt-cacher-ng:
$ sudo service apt-cacher-ng restart
apt-cacher-ng comes with a built-in web server to be able to proxy HTTP-based apt-get downloads. The integrated web server can also be accessible for web-based administration and reporting purposes. To verify that apt-cacher-ng works, point your web browser to http://<your-ip-address>:3142/acng-report.html.
And by default it caches repositories/debs into /home/apt-cacher-ng. Under this directory, it creates a directory per repository used in your Debian/Ubuntu servers, then distros used, much similar to mirror structures. As an added bonus, is also much easier to fetch manually a deb from cache here, than from a Squid server.
Configuring clients
Once the apt-cacher server is ready, you need to configure other (client) machines, VMs or containers so that they can install packages through the caching server. On every client machine, create the proxy configuration in /etc/apt/apt.conf.d, pointing to the caching server as follows.
$ sudo gedit /etc/apt/apt.conf.d/00aptproxy
Add:
Acquire::http::Proxy "http://192.168.1.242:3142";
Note: according to another source:
To use it in all your servers (clients?), add to the directory /etc/apt/apt.conf.d
a file 02proxy with the contents:
Acquire::http { Proxy "http://your_proxy_APT_server:3142"; };
After you add that file, the Debian package manager will proxy all the configured
repositories via the configured http APT proxy. It also got an interesting statics
page for consulting it's activity.
You might also need to open 3142/TCP in your firewalls to allow the servers
to talk with your new proxy APT server.
The advantage of such setup is that besides downloading only one deb copy for a
bucketload of servers, and saving bandwidth and the public repositories usage is
that it allows you to update internal servers that do not need to have Internet access
(example: DHCP servers).
As documented in Appendix B of the Official Install Guide, you can have your DHCP
server give out a preseed file, by adding something like this to it's config:
if substring (option vendor-class-identifier, 0, 3) = "d-i" {

    filename "http://host/preseed.cfg";

}
Then using these preseed options, you can configure the mirror and proxy automatically:
-i mirror/protocol string http

d-i mirror/country string manual

d-i mirror/http/hostname string http.us.debian.org

d-i mirror/http/directory string /debian

d-i mirror/http/proxy string http://your_proxy_APT_server:3128/
As the client machines install packages, the caching server will start caching downloaded packages in /var/cache/apt-cacher-ng.
Note that disk cache is organized for different distributions (e.g., Debian, Ubuntu, Linu Mint).

Useful Tips When using apt-cacher-ng
Access Control
Sometimes it is useful to restrict the access to apt-cacher-ng server for security purposes. apt-cacher-ng comes with built-in ACL (access-control-list) support using TCP wrappers. So if you want to set up a whitelist or blacklist for incoming connections to the server, you can use /etc/hosts.allow or /etc/hosts.deny.
For example, if you want to block particular IP addresses (192.168.1.242, 192.168.1.100),
you can specify the following.
In /etc/hosts.deny:
apt-cacher-ng : 192.168.1.242 192.168.1.100
If you want to block all local traffic (192.168.1.0/24) except for 192.168.1.160,
do the following.
In /etc/hosts.allow:
apt-cacher-ng : 192.168.1.160
In /etc/hosts.deny:
apt-cacher-ng : 192.168.1.0/24
There is no need to restart apt-cacher-ng when setting up ACLs.
Local Cache Cleanup
As apt-cacher-ng server starts to cache downloaded packages, the disk on the server will start to fill up over time. Thus you need to clean up its disk space regularly.
We can use web-based interface can help with that. Simply click on Start Scan button, and it will scan cache content and schedule any unnecessary packages to be removed from the disk.

Alternatively, you can manually (or via cron job) clean up the whole cache as follows:
$ sudo service apt-cacher-ng stop

$ sudo rm -rf /var/cache/apt-cacher-ng/

$ sudo service apt-cacher-ng start
Using Docker
As a final bonus, here is how to set up apt-cacher-ng server with a single Docker command (assuming that you already installed Docker). Spin off an apt-cacher-ng container whenever you need it, and throw it away when done. No need to mess up the host system.
$ docker run --name apt-cacher-ng -d --restart=always --publish 3142:3142 --volume /srv/docker/apt-cacher-ng:/var/cache/apt-cacher-ng sameersbn/apt-cacher-ng:latest
I. Cleanup after software removal
Here is a bash script for removing the dependencies after removing the packages.
#!/bin/bash


OLDCONF=$(dpkg -l|grep "^rc"|awk '{print $2}')

CURKERNEL=$(uname -r|sed 's/-*[a-z]//g'|sed 's/-386//g')

LINUXPKG="linux-(image|headers|ubuntu-modules|restricted-modules)"

METALINUXPKG="linux-(image|headers|restricted-modules)-(generic|i386|server|common|rt|xen)"

OLDKERNELS=$(dpkg -l|awk '{print $2}'|grep -E $LINUXPKG |grep -vE $METALINUXPKG|grep -v $CURKERNEL)

YELLOW="\033[1;33m"

RED="\033[0;31m"

ENDCOLOR="\033[0m"


if [ $USER != root ]; then

    echo -e $RED"Error: must be root"

    echo -e $YELLOW"Exiting..."$ENDCOLOR

    exit 0

fi


echo -e $YELLOW"Cleaning apt cache..."$ENDCOLOR

aptitude clean


echo -e $YELLOW"Removing old config files..."$ENDCOLOR

sudo aptitude purge $OLDCONF


echo -e $YELLOW"Removing old kernels..."$ENDCOLOR

sudo aptitude purge $OLDKERNELS


echo -e $YELLOW"Emptying every trashes..."$ENDCOLOR

rm -rf /home/*/.local/share/Trash/*/** &> /dev/null

rm -rf /root/.local/share/Trash/*/** &> /dev/null


echo -e $YELLOW"Script Finished!"$ENDCOLOR
Save the file with .sh extension (ie cleaner.sh).
Right click the file choose properties>>permissions and check execute.
To run this script,type the following in terminal.
$ sudo bash /path/to/the/script
Copying the entire content of Ubuntu repositories.
The Ubuntu software repository is organized into four "components",
on the basis of the level of support Ubuntu can offer them, and whether
or not they comply with Ubuntu's Free Software Philosophy.
The components are called Main (officially supported software),
Restricted (supported software that is not available under a
completely free license), Universe (community-maintained, i.e.
not officially supported software) and Multiverse
(software that is "not free").
The standard Ubuntu installation is a subset of software available
from the main and restricted components.
J. Using wget
This is probably the easiest approach. We use wget utility to grab the .rpm files from one of the mirrors of archive.ubuntu.com - and that's it.
It has some disadvantages though:
First, if you want to update the archive you got earlier, you will have
to do your own research in order to be able to only grab
new files.
Second, all you will get is bunch of .rpm files, to use it as
a local repository, you will still need to either move them to another
computer (described in sections above) or to run a server
(described in sections below).
However, if you want to grab a copy of repos "just in case", and do not need to configure anything right now, then yes, this is the easiest way.
use XX.archive.ubuntu.com where XX is a two-letter country code ("us" for United States is used in this example).
$ wget --recursive -A rpm http://us.archive.ubuntu.com/ubuntu/
The "-A rpm" is added to reject anything that isn't an rpm
Installing server
This step is required only if you are planning to use the files you copied from the Ubuntu repos to your local repository, making them available over LAN. However, there is a second possible scenario: you might want to have the archive of Ubuntu repos "just in case"; in that case you can skip the server installation (and do it later, if necessary). Also, according to a third scenario, you can copy repos between your computers using some kind of a removable storage.
K. Installing Apache HTTP server
This is a recommended (by me) way.
$ sudo apt install apache2

# or

$ sudo apt install -y apache2


# By default, Debian's Apache package will set up a website

# under /var/www on your system. For our purposes, that's fine,

# so there's no reason to do anything more. You can easily test

# it by pointing your favorite browser at http://localhost

# You should see the default post-installation web page which is

# actually stored in /var/www/index.html


# Allow Apache service port in Linux firewall

$ sudo ufw allow http


# Validate that the service runs at startup

$ sudo systemctl enable apache2


# cd to the Apache default DocumentRoot Directory

$ cd /var/www/html


# Create the Ubuntu subdirectory

$ sudo mkdir -p /var/www/html/ubuntu


# Assign the directory to the appropriate owner,

# in this case www-data (the Apache HTTP user)

$ sudo chown www-data:www-data /var/www/html/ubuntu
Note: In order to be able to enlarge the size of a volume without interrupting the service, it is recommended to have the DocumentRoot or at least the Ubuntu subfolder on a filesystem belonging to a logical volume.
We are done with server installation, to continue, jump to Using apt-mirror section.
L. Installing Proftpd server
Disclaimer: I have never tried this approach.
$ sudo apt-get install proftpd-basic
Create anonymous configuration file for proftpd.
$ sudo touch /etc/proftpd/conf.d/anonymous.conf

$ sudo gedit /etc/proftpd/conf.d/anonymous.conf
Then add the following content to anonymous.conf file and restart proftd service:
<Anonymous ~ftp>

    User                    ftp

    Group                nogroup

    UserAlias         anonymous ftp

    RequireValidShell        off

    # MaxClients                   10

    <Directory *>

        <Limit WRITE>

            DenyAll

        </Limit>

    </Directory>

</Anonymous>
Next step is to link apt-mirror path to proftpd path by running a bind mount:
$ sudo mount --bind /opt/apt-mirror/mirror/archive.ubuntu.com/ /srv/ftp/
To verify it, run mount command with no parameter or options:
$ mount
Last step is to make sure that Proftpd server is automatically started after system reboot and mirror-cache directory is also automatically mounted on ftp server path. To automatically enable proftpd run the following command:
$ sudo update-rc.d proftpd enable
To automatically mount apt-mirror cache on proftpd, open and edit /etc/rc.local file:
$ sudo gedit /etc/rc.local
Add the following line before exit 0 directive. Also use 5 seconds delay before attempting to mount:
sleep 5

sudo mount --bind  /opt/apt-mirror/mirror/archive.ubuntu.com/ /srv/ftp/
If you pull packages from Debian repositories run the following commands and make sure appropriate settings for above rc.local file are enabled:
$ sudo mkdir /srv/ftp/debian

$ sudo mount --bind /opt/apt-mirror/mirror/ftp.us.debian.org/debian/ /srv/ftp/debian/
M. nginx and reprepro
Disclaimer: I have never tried this approach.
Install debian packages:
$ sudo apt-get install reprepro nginx
Make directories for reprepro and edit it:
$ sudo mkdir -p /srv/reprepro/ubuntu/{conf,dists,incoming,indices,logs,pool,project,tmp}


$ cd /srv/reprepro/ubuntu/


# changes the repository owner to the current user

$ sudo chown -R `whoami` .

/srv/reprepro/ubuntu/conf/distributions


Origin: Your Name

Label: Your repository name

Codename: karmic

Architectures: i386 amd64 source

Components: main

Description: Description of repository you are creating

SignWith: YOUR-KEY-ID

/srv/reprepro/ubuntu/conf/options


ask-passphrase

$ basedir .
Include it in reprepro, build it:
# change /path/to/my-package_0.1-1.deb to the path to your package

$ reprepro includedeb karmic /path/to/my-package_0.1-1.deb \


# Config nginx:

/etc/nginx/sites-available/vhost-packages.conf


server {

    listen 80;

    server_name packages.internal;


    access_log /var/log/nginx/packages-access.log;

    error_log /var/log/nginx/packages-error.log;


    location / {

        root /srv/reprepro;

        index index.html;

    }


    location ~ /(.*)/conf {

        deny all;

    }


    location ~ /(.*)/db {

        deny all;

    }

}
Optimize bucket size in /etc/nginx/conf.d/server_names_hash_bucket_size.conf:
server_names_hash_bucket_size 64;
N. Using apt-mirror
This approach is usually used together with setting up a server, so that you can use your local repo from your local network. However, the apt-mirror can also download everything "just to have it", same as wget from the section above, in which case the server is not required (or you can install it later).
The advantage over wget is that you can run updates, obtaining new or altered files, without the need to download everything again.
$ sudo apt update

$ sudo apt upgrade

# or

$ sudo apt update && sudo apt upgrade


$ sudo apt install apt-mirror

# or

$ sudo apt install -y apt-mirror
Now we can select repositories that we want to mirror.
First, make a backup copy of the mirror.list configuration file
(this file is created during apt-mirror installation):
$ sudo cp /etc/apt/mirror.list /etc/apt/mirror.list.org

# or

$ sudo cp /etc/apt/mirror.list /etc/apt/mirror.list-bak
Edit the config file and change the base_path to the default document
root.
What is "default document root"?
By default apt-mirror uses /var/spool/apt-mirror location for local cache;
we can change system path and point set base_path directive to other place.
If you just want an archive, and do not plan on using it as a repo "right now",
you can specify any path. However, if you want to use this archive with a server,
you should use the default document root of this server (/var/www/html/ubuntu).
Also, update repositories you want to copy:
$ gedit /etc/apt/mirror.list
mirror.list:
############# config ###################

set base_path    "/var/www/html/ubuntu"

set nthreads     20

set _tilde 0

#

# set mirror_path  $base_path/mirror

# set skel_path    $base_path/skel

# set var_path     $base_path/var

# set cleanscript $var_path/clean.sh

# set defaultarch  <running host architecture>

# set postmirror_script $var_path/postmirror.sh

# set run_postmirror 0

############# end config ##############

#

deb http://archive.ubuntu.com/ubuntu focal main restricted universe multiverse

deb http://archive.ubuntu.com/ubuntu focal-security main restricted universe multiverse

deb http://archive.ubuntu.com/ubuntu focal-updates main restricted universe multiverse

# deb http://archive.ubuntu.com/ubuntu focal-proposed main restricted universe multiverse

# deb http://archive.ubuntu.com/ubuntu focal-backports main restricted universe multiverse


# deb-src http://archive.ubuntu.com/ubuntu focal main restricted universe multiverse

# deb-src http://archive.ubuntu.com/ubuntu focal-security main restricted universe multiverse

# deb-src http://archive.ubuntu.com/ubuntu focal-updates main restricted universe multiverse

# deb http://archive.ubuntu.com/ubuntu focal-proposed main restricted universe multiverse

# deb http://archive.ubuntu.com/ubuntu focal-backports main restricted universe multiverse


clean http://archive.ubuntu.com/ubuntu
Note:
# Main configuration file

/etc/apt/mirror.list


# Cron configuration template

/etc/cron.d/apt-mirror


# Mirror places here

/var/spool/apt-mirror/mirror


# Place for temporarily downloaded indexes

/var/spool/apt-mirror/skel


# Log files placed here. URLs and MD5 checksums also here.

/var/spool/apt-mirror/var
There is a chance that you need to add [trusted=yes] after deb instances in your sources.list.
In the mirror.list above, the src package repositories are commented out, if you need src packages, uncomment them.
Uncomment the lines you would like to get packages from. For example, if you would like to sync with var than erase the # symbol from the line.
Copy a script into /var/www/html/ubuntu/var/:
$ sudo mkdir -p /var/www/html/ubuntu/var

$ sudo cp /var/spool/apt-mirror/var/postmirror.sh /var/www/html/ubuntu/var/
To start mirroring the remote repos packages to the local server:
$ sudo apt-mirror
If you need to, you can interrupt this process (CTRL+C) and restart it later; it will resume from where was left.
Once the clean.sh and postmirror.sh scripts are executed, the mirroring process has been completed.
=== Another source ===
Now the contents of /myrepo directory should be made available
over HTTP (web) to our clients. To do that, simply create a symbolic link
to the /myrepo directory:
$ cd /myrepo/

$ sudo ln -s /myrepo/mirror/us.archive.ubuntu.com/ubuntu/ ubuntu
M. Fix for CNF files
CNF stands for "command not found": if you try to run "xxx", your terminal should respond with something like "xxx not found, try 'apt install xxx'". This functionality was introduced in Ubuntu 19.04, and apt-mirror (that is not maintained), doesn't know about CNF, and doesn't download the files.
There are at least two solutions for this problem: either we can use one of maintained forks of apt-mirror (https://github.com/Stifler6996/apt-mirror), or we can download these files using an alternative way (wget).
Installing a fork is entirely up to you, Internet reviews are rather positive. In this section, let's focus on an alternative way of downloading CNF files.
Create a shell script:
$ gedit cnf.sh
cnf.sh:
#!/bin/bash

for p in "${1:-focal}"{,-{security,updates}}/{main,restricted,universe,multiverse};do >&2 echo "${p}"

wget -q -c -r -np -R "index.html*" "http://archive.ubuntu.com/ubuntu/dists/${p}/cnf/Commands-amd64.xz"

wget -q -c -r -np -R "index.html*" "http://archive.ubuntu.com/ubuntu/dists/${p}/cnf/Commands-i386.xz"

done


# or (depending what you want to copy)


$ vi cnf.sh

#!/bin/bash

for p in “${1:-focal}”{,-{security,updates,proposed,backports}}/{main,restricted,universe,multiverse};do >&2 echo “${p}”

wget -q -c -r -np -R “index.html*” “http://archive.ubuntu.com/ubuntu/dists/${p}/cnf/Commands-amd64.xz”

wget -q -c -r -np -R “index.html*” “http://archive.ubuntu.com/ubuntu/dists/${p}/cnf/Commands-i386.xz”

done
Execute the script to download CNF directory and its files.
$ chmod +x cnf.sh

$ bash  cnf.sh
This script will create a folder named archive.ubuntu.com in the current working directory. Copy this folder to mirror folder:
$ sudo cp -av archive.ubuntu.com /var/www/html/ubuntu/mirror/
Errors you will get on client computers if you don't run this script:
E: Failed to fetch http://x.x.x.x/ubuntu/mirror/archive.ubuntu.com/ubuntu/dists/focal/restricted/cnf/Commands-amd64  404  Not Found [IP:169.144.104.219 80]

E: Failed to fetch http://x.x.x.x/ubuntu/mirror/archive.ubuntu.com/ubuntu/dists/focal-updates/main/cnf/Commands-amd64  404  Not Found [IP:169.144.104.219 80]

E: Failed to fetch http://x.x.x.x/ubuntu/mirror/archive.ubuntu.com/ubuntu/dists/focal-security/main/cnf/Commands-amd64  404  Not Found [IP:169.144.104.219 80]
Technically speaking, you will only need to run cnf.sh script once. But if you have multiple repositories for different versions of Ubuntu then you should execute this script for each of them.
Also, In case you are not creating repositories of 32-bit packages then you can comment out the line in script which is downloading 32-bit package.
Finally, in the /etc/apt/sources.list file we have the following line: clean 'http://archive.ubuntu.com/ubuntu'. It cleans everything, including cnf directories and their contents. So either you have to reload CNF files every time you run apt-mirror, or you need to comment this line (or handle the problem somehow else, like make a backup, copy it back).
N. Fix for "Release file expired"
sudo apt-get update, that you run from the client, might have problems
with packages expiration: the release files have a valid-until entry,
e.g. Valid-Until: Thu, 07 Oct 2010 08:17:56 UTC.
Add the following to the command:
-o Acquire::Check-Valid-Until=false

# Ex.:

$ sudo apt-get -o Acquire::Check-Valid-Until=false update
O. Using debmirror
I am not going to consider the use of debmirror here for a simple reason: it is essentially the same as apt-mirror, and (surprise!) also doesn't support CNF files. When CNF support is added, I might update this section, but right now there is no point in doing it.
Nevertheless, contradictory to what I just said, here is a description: it is for a rather old version of Ubuntu, and I have never tested it.
How to create and use a local repository mirror on Ubuntu 9.10.
# File: HOWTO Create a Local Repository Mirror on Ubuntu.notes

# Date: 2010/03/17

# Refs: https://help.ubuntu.com/community/Debmirror

#       http://ubuntuforums.org/archive/index.php/t-599479.html

#       http://www.arsgeek.com/2007/02/14/how-to-set-up-your-own-local-repositories-with-apt-mirror/

#       http://pwet.fr/man/linux/commandes/debmirror

# Desc: How to create a local repository for

#       Ubuntu 9.10 Karmic Koala.


# -------------------------------------

#           Setup the Server

# -------------------------------------

# Install Ubuntu (I used 9.10) on a machine with plenty of

# free storage space (I used an 8GB OS vmdk and an 80GB data

# vmdk used through LVM so that I could easily add/grow to

# it in the future if necessary).


# Create the mirror user, I'll be using ubuntu.

# NOTE: You don't have to add this user to the wheel but if you don't, the steps below that require sudo

#       will require you to run them from an account with root or wheel access and may also require

#       that you change the ownership/group of files/directories afterwards.

sudo useradd -m ubuntu -Gusers,wheel

sudo password ubuntu


# UPDATE 2012/01/30: As Dave points out below, you'll need to create your mirrorkeyring folder with the correct user account.

#                    If you aren't already running as that user, you can change your shell using su

su - ubuntu


# Update your apt-get package listing

sudo apt-get update


# Install debmirror

sudo apt-get install debmirror


# Create the location for the repo data to live

sudo mkdir -P /mirror/ubuntu


# Set the permissions for the repo data

sudo chown -R ubuntu:ubuntu /mirror/ubuntu

sudo chmod -R 771 /mirror/ubuntu


# Setup the keyring for correctly verifying Release signatures

gpg --no-default-keyring --keyring /home/ubuntu/mirrorkeyring/trustedkeys.gpg --import /usr/share/keyrings/ubuntu-archive-keyring.gpg


# Create the mirrorbuild.sh script

vim /home/ubuntu/mirrorbuild.sh


# NOTE: The ubuntu community documentation has you using

#       the HTTP protocol for the mirror build script

#       however, I prefer rsync because we can rate limit.

#       When the download is going to take days,

#       I'd like to be able to use my connection in

#       the interim.


# --------------------------------------------

# BEGIN MIRRORBUILD.SH SCRIPT

# --------------------------------------------


#!/bin/bash


## Setting variables with explanations.


#

# Don't touch the user's keyring, have our own instead

#

export GNUPGHOME=/home/ubuntu/mirrorkeyring


# Arch=         -a      # Architecture.

# For Ubuntu can be i386, amd64, powerpc and/or sparc (sparc support begins with dapper)

#

# Comma separated values

arch=i386,amd64


# Minimum Ubuntu system requires main, restricted

# Section=      -s      # Section

# (One of the following - main/restricted/universe/multiverse).

# You can add extra file with $Section/debian-installer.

# ex: main/debian-installer,universe/debian-installer,multiverse/debian-installer,restricted/debian-installer

section=main,restricted,universe,multiverse


# Release=      -d      # Release of the system

# (Dapper, Edgy, Feisty, Gutsy, Hardy, IntrepidJaunty, Karmic),

# and the -updates and -security ( -backports can be added if desired)

dist=karmic,karmic-updates,karmic-security


# Server=       -h      # Server name,

# minus the protocol and the path at the end

# CHANGE "*" to equal the mirror you want to create your

# mirror from. au. in Australia  ca. in Canada. This can be

# found in your own /etc/apt/sources.list file,

# assuming you have Ubuntu installed.

server=us.archive.ubuntu.com


# Dir=          -r      # Path from the main server,

# so http://my.web.server/$dir, Server dependant

# Lead with a '/' for everything but rsync,

# where we lead with a ':'

inPath=:ubuntu


# Proto=        -e      # Protocol to use for transfer

# (http, ftp, hftp, rsync)

# Choose one - http is most usual the service, and the

# service must be availabee on the server you point at.

# NOTE: debmirror uses -aIL --partial by default.

#       However, if you provide the --rsync-options

#       paramter (which we do) then you HAVE to provide

#       it -aIL --partial in addition to whatever You

#       want to add (e.g. --bwlimit) If you don't

#       debmirror will exit with thousands of files

#       missing.

proto=rsync

rsyncoptions="-aIL --partial --bwlimit=100"


# Outpath=              # Directory to store the mirror in

# Make this a full path to where you want to mirror the material.

#

outPath=/mirror/ubuntu/


# The --nosource option only downloads debs and not deb-src's

# The --progress option shows files as they are downloaded

# --source \ in the place of --no-source \ if you want sources also.

# --nocleanup  Do not clean up the local mirror after mirroring

# is complete. Use this option to keep older repository

# Start script

#

debmirror       -a $arch \

                --no-source \

                -s $section \

                -h $server \

                -d $dist \

                -r $inPath \

                --progress \

                -e $proto \

                --rsync-options="$rsyncoptions" \

                $outPath


# -----------------------------------------------------

# END BUILDMIRROR.SH SCRIPT

# -----------------------------------------------------


# Add execute permissions on the mirrorbuild.sh script

chmod +x mirrorbuild.sh


# Run the script

./mirrorbuild.sh


# Go home, kick back, have a beer while it downloads 43GBs

# (in the case of karmic, karmic-update, karmic-securty for

# i386 and amd64)


# --------------------------------------

#          Setup the mirror

# --------------------------------------

# Install apache2

sudo apt-get install apache2


# Symlink the mirror data into the web root

sudo ln -s /mirror/ubuntu /var/www/ubuntu


# Point your browser at http://localhost/ubuntu and

# you should see your pool!


# -------------------------------------

#        Updating the Repo Mirror

# -------------------------------------

# To update the repo mirror, just execute the mirrorbuild.sh

# script used to initially build it.

./mirrorbuild.sh


# -------------------------------------

#   Configure Clients to Use this Repo

# -------------------------------------

# Update the apt sources list

cd /etc/apt

sudo mv sources.list sources.list.orig

sudo sensible-editor sources.list


# Replace 'mirrorbox' with your server's DNS name

# (e.g. karmic-repo.test.com)

# -----------------------------------------------------------------------------

# BEGIN SOURCES.LIST

# -----------------------------------------------------------------------------

# Local network mirror sources.

deb http://mirrorbox/ubuntu focal main restricted universe multiverse

deb http://mirrorbox/ubuntu focal-updates main restricted universe multiverse

deb http://mirrorbox/ubuntu focal-security main restricted universe multiverse

# -----------------------------------------------------------------------------

# END SOURCES.LIST

# -----------------------------------------------------------------------------


# Test to see if you are able to pull down updates

# from the new mirror

sudo apt-get update
P. Using Rsyncmirror
rsync is required to build and maintain our mirror. mailx is only required if you want to have your script email you when something goes wrong.
Installation
$ apt-get install rsync mailx
First download
$ mkdir /media/mirror/ubuntu


# We will limit it to 128 KiloBytes per second: just an example

# If you want to see the progress of the download, you can add the --progress flag to the command.

$ rsync -a --bwlimit=128 rsync://archive.ubuntu.com/ubuntu /media/mirror/ubuntu
Script to keep it up to date
Copy and paste the script from https://wiki.ubuntu.com/Mirrors/Scripts to "/usr/local/bin/sync_ubuntu_mirror.sh".
Archive mirrors

For archive mirrors, it is very important not to delete packages before the Packages.gz-files (which hold information about the packages available) are updated. Therefor, you need a 'Two stage sync'. This means that you download new packages first, and new Packages.gz after that. After you've downloaded the Packages.gz files, it's safe to delete old packages.


The script


#/bin/dash


fatal() {

  echo "$1"

  exit 1

}


warn() {

  echo "$1"

}


# Find a source mirror near you which supports rsync on

# https://launchpad.net/ubuntu/+archivemirrors

# rsync://.rsync.archive.ubuntu.com/ubuntu should always work

RSYNCSOURCE=rsync://archive.ubuntu.mirror.isp.com/ubuntu


# Define where you want the mirror-data to be on your mirror

BASEDIR=/var/www/ubuntuarchive/


if [ ! -d ${BASEDIR} ]; then

  warn "${BASEDIR} does not exist yet, trying to create it..."

  mkdir -p ${BASEDIR} || fatal "Creation of ${BASEDIR} failed."

fi


rsync --recursive --times --links --safe-links --hard-links \

  --stats \

  --exclude "Packages*" --exclude "Sources*" \

  --exclude "Release*" --exclude "InRelease" \

  ${RSYNCSOURCE} ${BASEDIR} || fatal "First stage of sync failed."


rsync --recursive --times --links --safe-links --hard-links \

  --stats --delete --delete-after \

  ${RSYNCSOURCE} ${BASEDIR} || fatal "Second stage of sync failed."


date -u > ${BASEDIR}/project/trace/$(hostname -f)

Releases mirrors

For Releases mirrors, stuff is a little less complicated. There are no dependencies between files, so you can just rsync away.


# =======


The script


# =======


#/bin/dash


fatal() {

  echo "$1"

  exit 1

}


warn() {

  echo "$1"

}


# Find a source mirror near you which supports rsync on

# https://launchpad.net/ubuntu/+cdmirrors

# rsync://.rsync.releases.ubuntu.com/releases should always work

RSYNCSOURCE=rsync://releases.ubuntu.mirror.isp.com/releases


# Define where you want the mirror-data to be on your mirror

BASEDIR=/var/www/ubuntureleases/


if [ ! -d ${BASEDIR} ]; then

  warn "${BASEDIR} does not exist yet, trying to create it..."

  mkdir -p ${BASEDIR} || fatal "Creation of ${BASEDIR} failed."

fi


rsync --verbose --recursive --times --links --safe-links --hard-links \

  --stats --delete-after \

  ${RSYNCSOURCE} ${BASEDIR} || fatal "Failed to rsync from ${RSYNCSOURCE}."


date -u > ${BASEDIR}/.trace/$(hostname -f)
Use Cron
Official Ubuntu Mirrors are recommended to update their mirrors every 6 hours. In the case of your site, this may not be necessary nor desired.
$ crontab -e
15 21 * * * /usr/local/bin/sync-ubuntu-mirror.sh > /dev/null 2> /dev/null
Publish the mirror on the Apache server
This is the easy part. Assuming that you have Apache configured to follow symbolic links, all you need to do is add a symbolic link to your mirror!
$ cd /var/www/

$ ln /media/mirror/ubuntu -s
Update Your Clients
Now that you have your very own Ubuntu Mirror, you need to point all of your workstations and servers to this mirror for their updates. This mirror will be good for main, universe, multi-verse, and restricted.
Replace the server name for the Ubuntu Archives with your local mirror. The existing
server will likely be something like us.ubuntu.com
If your server is called ubuntumirror.mydomain then your /etc/apt/sources.list
file should look something like this
deb http://ubuntumirror.mydomain/ubuntu/ focal main restricted

deb-src http://ubuntumirror.mydomain/ubuntu/ focal main restricted


deb http://ubuntumirror.mydomain/ubuntu/ focal-updates main restricted

deb-src http://ubuntumirror.mydomain/ubuntu/ focal-updates main restricted
You can test your mirror by running
$ apt-get update
You should see some output referencing your server, similar to this:
Get:1 http://ubuntumirror.mydomain focal Release.gpg [191B]

Ign http://ubuntumirror.mydomain focal/main Translation-en_US

Ign http://ubuntumirror.mydomain focal/restricted Translation-en_US

Get:2 http://ubuntumirror.mydomain focal-updates Release.gpg [191B]

Ign http://ubuntumirror.mydomain focal-updates/main Translation-en_US
Setup CronJob to update your repositories
You can run a cron job to periodically update the local repository:
$ sudo crontab -e
Edit the crontab and add the following line:
00 	03 	*	 *	 *	/usr/bin/apt-mirror

# or

0  2  *  *  *  /usr/bin/apt-mirror >> /opt/apt-mirror/mirror/archive.ubuntu.com/ubuntu/apt-mirror.log
Configuring the Linux client to use the local repository server
In this example, I am going to use a second Ubuntu 20.04 lts system (a client computer) where I will update /etc/apt/sources.list file so that apt command points to local repositories instead of remote.
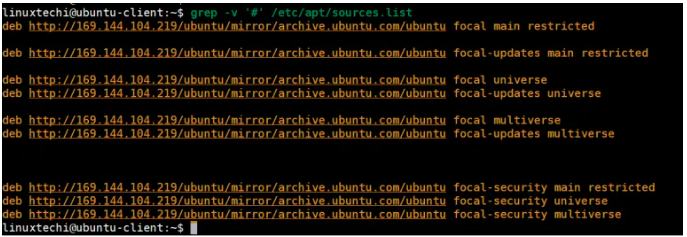
To configure local Ubuntu clients, edit /etc/apt/source.list on client computers to point to the IP address or hostname of apt-mirror server - replace http protocol with ftp, then update system.
Login to the system, change the following in the sources.list:
http://archive.ubuntu.com/ubuntu

to

http://169.144.104.219/ubuntu/mirror/archive.ubuntu.com/ubuntu
Here '169.144.104.219' is the IP Address of my apt repository server, replace this ip address that suits to your environment.
In any client which is going to use our local repository we need to edit the configuration file /etc/apt/sources.list specifying our local repo and disabling any remote one.
It is recommended to comment any line in the /etc/apt/sources.list file referring to repositories not mirrored in our server, for instance, in this case, any line starting with deb-src and containing (whatever)-backports have been commented. If you don't do that you might get the error:
Release file has not been found when running the command apt update on the client.
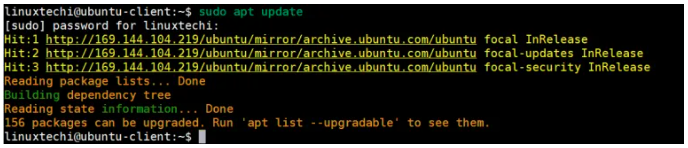
Update local repository index:
Make sure the port 80 is not blocked by the client firewall and then you can run:
$ sudo apt update
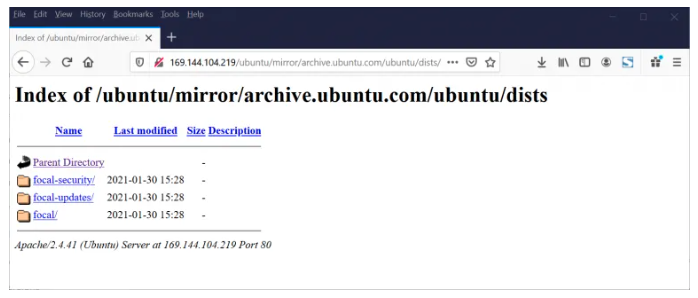
Accessing Local APT repository via web browser
If apatche is used
http://<Server-IP>/ubuntu/mirror/archive.ubuntu.com/ubuntu/dists/
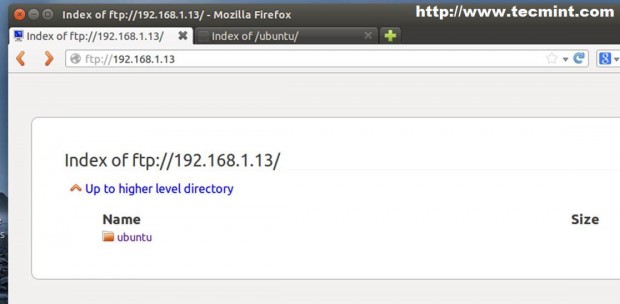
If FTP server is used:
To view repositories you can actually open a browser and point to your server IP
address of domain name using FTP protocol.
Sources:
https://kc.jetpatch.com/hc/en-us/articles/360052181591-Setting-Up-Local-Repositories-Ubuntu-16-04-18-04-20-04

https://www.linuxtechi.com/setup-local-apt-repository-server-ubuntu/

https://sandeeprao.net/setup-ubuntu-20-04-repository-mirror-server/

https://linuxconfig.org/how-to-create-a-ubuntu-repository-server

https://www.tecmint.com/setup-local-repositories-in-ubuntu/

https://gist.github.com/jeanlescure/084dd6113931ea5a0fd9

https://www.centlinux.com/2021/04/create-local-apt-repository-in-ubuntu.html

https://help.ubuntu.com/community/Repositories/Personal

https://linuxopsys.com/topics/create-your-own-repository-for-packages-on-debian

https://unix.stackexchange.com/questions/694346/transfering-and-offline-installing-net-tools-in-an-ubuntu-server-with-no-interne

https://askubuntu.com/questions/85642/wget-to-download-ubuntu-repo

https://askubuntu.com/questions/170348/how-to-create-a-local-apt-repository

https://www.unixmen.com/setup-local-repository-in-ubuntu-15-04/

https://unix.stackexchange.com/questions/115272/download-package-via-apt-for-another-architecture

https://askubuntu.com/questions/15211/saving-deb-files-from-repositories-to-a-custom-location-for-installing-offline

https://askubuntu.com/questions/15584/off-line-repository-and-software-removal

https://manpages.ubuntu.com/manpages/bionic/man1/apt-mirror.1.html

https://help.ubuntu.com/community/Apt-Cacher-Server

https://wiki.debian.org/DebianRepository/Setup

http://littlesvr.ca/grumble/2020/07/12/set-up-your-own-linux-mint-mirror-for-lightning-fast-downloads/

https://wiki.debian.org/DebianRepository/Setup#Debian_Repository_Mirroring_Tools

https://www.zachburlingame.com/2011/05/howto-create-a-local-repository-mirror-on-ubuntu/

https://help.ubuntu.com/community/Rsyncmirror

https://wiki.debian.org/AptCacherNg

https://www.unix-ag.uni-kl.de/~bloch/acng/

https://www.unix-ag.uni-kl.de/~bloch/acng/html/howtos.html

https://packages.ubuntu.com/

https://unix.stackexchange.com/questions/383505/can-i-easily-make-a-host-mirror-that-caches-downloaded-debian-packages/383527#383527

https://www.xmodulo.com/apt-caching-server-ubuntu-debian.html

https://www.debian.org/mirror/size
https://kc.jetpatch.com/hc/en-us/articles/360052181591-Setting-Up-Local-Repositories-Ubuntu-16-04-18-04-20-04
https://www.linuxtechi.com/setup-local-apt-repository-server-ubuntu/
https://sandeeprao.net/setup-ubuntu-20-04-repository-mirror-server/
https://linuxconfig.org/how-to-create-a-ubuntu-repository-server
https://www.tecmint.com/setup-local-repositories-in-ubuntu/
https://gist.github.com/jeanlescure/084dd6113931ea5a0fd9
https://www.centlinux.com/2021/04/create-local-apt-repository-in-ubuntu.html
https://help.ubuntu.com/community/Repositories/Personal
https://linuxopsys.com/topics/create-your-own-repository-for-packages-on-debian
https://unix.stackexchange.com/questions/694346/transfering-and-offline-installing-net-tools-in-an-ubuntu-server-with-no-interne
https://askubuntu.com/questions/85642/wget-to-download-ubuntu-repo
https://askubuntu.com/questions/170348/how-to-create-a-local-apt-repository
https://www.unixmen.com/setup-local-repository-in-ubuntu-15-04/
https://unix.stackexchange.com/questions/115272/download-package-via-apt-for-another-architecture
https://askubuntu.com/questions/15211/saving-deb-files-from-repositories-to-a-custom-location-for-installing-offline
https://askubuntu.com/questions/15584/off-line-repository-and-software-removal
https://manpages.ubuntu.com/manpages/bionic/man1/apt-mirror.1.html
https://help.ubuntu.com/community/Apt-Cacher-Server
https://wiki.debian.org/DebianRepository/Setup
http://littlesvr.ca/grumble/2020/07/12/set-up-your-own-linux-mint-mirror-for-lightning-fast-downloads/
https://wiki.debian.org/DebianRepository/Setup#Debian_Repository_Mirroring_Tools
https://www.zachburlingame.com/2011/05/howto-create-a-local-repository-mirror-on-ubuntu/
https://help.ubuntu.com/community/Rsyncmirror
https://wiki.debian.org/AptCacherNg
https://www.unix-ag.uni-kl.de/~bloch/acng/
https://www.unix-ag.uni-kl.de/~bloch/acng/html/howtos.html
https://packages.ubuntu.com/
https://unix.stackexchange.com/questions/383505/can-i-easily-make-a-host-mirror-that-caches-downloaded-debian-packages/383527#383527
https://www.xmodulo.com/apt-caching-server-ubuntu-debian.html
https://www.debian.org/mirror/size